Monday, September 30, 2013

Solar Updated

I've spent a lot of time on this system......Please do not let my example scare you off from doing your own.......my struggles are not a good example of the job...lol....got to love TBI.....

I have really seen my limitations in a new light with this modification to the 5th wheel....

I have not been updating the post as often as I'd like sorry.....

I believe the last update I was relocating the charge control  for the solar panels....I added a meter that shows all kinds of fun stuff like how much the solar panels are charging and how full the batteries are....

I relocated this into the bedroom just under the tv stand....the green light tells me the solar panels are charging.....a blinking light says the batteries are full....mine are now full :)


After all my set backs...not sure I even shared them all with you here, let's just say I wasted many days and a little bit of money on silly mistakes... I'll blame TBI...lol

Yesterday and today were dedicated to wiring the AC power with the addition of the new inverter.....to be honest the wiring of the inverter was one of the first things I worked out in my mind and on my notes....getting from a shore power plug set up for 50 amp service to feed the inverter and from the inverter to the service panel....easy enough right....

My trusty multi-meter helped me figure out which wires went where.....but...by the time I got back to this job I had lost my notes....funny thing I really thought it was in my note book with all the other notes on the trailer????

Well as things worked out I got side tracked for a few weeks right....I realized I had no idea how to go about wiring the inverter a few days ago so I have been dreading this one.....

I did work up the nerve to jump in and the first thing I found was a leaking water heater....lol....that got repaired, but it took me a whole day and really wiped me out......fatigue is one of my biggest challenges these days....especially if my head gets as low as my heart or if I have to look up for very long.....I think it has something to do with the damage done to my brain stem.....I also can have some really weird sensations in my hands and feet.....just have to learn to take things slow.... I did a post "Drip Drip Drip" about the water heater.

Yesterday, I was able to run the wires for the inverter.....I bought a very heavy 100 foot extension cord and ran it from the service panel, right next to the water heater under the kitchen sink(?????), back to the inverter which is mounted up near the battery box.....I spent a lot of time on my back running the wire under the kitchen cabinets, through the floor, under the trailer with the other wires and then back into the storage area where the inverter is mounted.
in this photo the shore wires are as they came from the factory


here it is as I made modification....that is heat shrink on the original cord....I soldered the joints and used heat shrink on every splice!!!!!


This is how I got back into the storage are from under the trailer....the wires follow the gas line which mad a nice strong support for the wires. I have the propane tank out

A little tidding up!!!

Here is the inverter mounted in the original battery storage area......I have it lag bolted to the wooden  floor under the metal box.

You can see how clean my largest storage bay is...lol!!!


Today I then ran another line back to the service box from the inverter......by doing it this way the shore line can still be packed away in it's original spot. I got things hocked up and yes the AC power works...

Tomorrow I hope to get the battery box finished up...I need to run all the cables so all the batteries are in use...right now I'm only using two of the 6 volt batteries making 12 volts.

I will then be able to hook up the inverter so we can see if the inverter runs the microwave.....oh ya the microwave.....another story for another day......let's just say I now use the surge protect that cost over $100.

Once every thing is done I plan to give a run down of the components in my solar system and will try to add links for all the parts I used if I ordered them on line.

If you have been following my blog you may have noticed a few changes....I'm talking more about TBI...traumatic brain injury....I hope it helps others understand TBI as it seems we all come in contact with TBI survivors and it helps to have a better understanding of their special needs and limitation. So please share my blog with others. 


Also, I added a link to Amazon, my favorite store.....they have almost everything I used so far at the best prices.

If you use the Amazon link it gives me a small commission at no cost to you so I invite you to use the link and remember to use PayPal...no commission for me, but it is safe.

Thanks for all your support by visiting my blog, sharing the blog and using my Amazon link.

Del


Drip Drip Drip

I was working on my solar system the other day. I was pulling drawers out so I could figure the best route for my wiring when I found a wet spot way back under the kitchen cabinets.....

Well water leaks are more important than wires so I just had to tear stuff apart to fix the leaks right?

I could see the fittings at the water heater were leaking, but there was no way for me to reach in there to see if I could get away with just tightening the fitting........

Here is a chance for me to share a few things about living with my brain injury.....stress fries my brain.....I guess a way to explain it is.....if a 12 volt light bulb is running and you suddenly drain the battery down the bulb just gets dim......that is kind of what happens to me......one of the first things that happen is my vision gets real fuzzy......

We have checked my eyes out a number of times and my eyes are just fine....it's my brain just kind of gives up....

I also start to make unwise decisions.....not a good thing when your fixing things...lol!!
Any way I was clear headed just a little stressed so I sat back and relaxed before I began to tear the water heater out.....better than just trying to tighten the old fitting and breaking something!!!

Getting the water heater loose from the outside wall of the trailer was easy enough....just took it slow.

Once I got it pulled out about a foot I was able to cut out the old plumbing and things went pretty smooth.....I just had to run down to the plumber supply  store where they fixed me up with a bunch of new parts including 3 ball valves.....one of the old valves started to leak when I turned it off so replacing them all now seemed like the thing to do...

I had read it is a good thing to have a way to bypass the water heater for winterizing the trailers....this one had that.....so I did keep the 3rd valve for the bypass....you can see it in the photo I took after I had finished the repairs and had the water heater reinstalled.

 
Another handy thing I did was add two quick release connectors one on the supply line and the other on the hot water line to the trailer....next time I will not need to cut the lines....lets just hope there is never a next time.

Wednesday, September 18, 2013

My new solar system batteries and vented box


 I am having lots of fun working on a new solar system for my RV.
I have purchased six 6 volt deep cycle golf cart batteries from National Battery here in Ogden.


 I started  building the battery box out of some left over lumber from my days as a long haul truck driver....I still have hundreds of them.  The box bottom is scrap from last summer's remodel of our house.
Being a bit of a pack rat shows up in these photos....the metal stands for my make shift work bench are left over from some old bar stools I stole the chairs of last summer to make seats for the little buro trailer. The work bench top is an old closet door I draged home to use at yard sales.


I did run down to Lowes for some plywood for the sides and top.....mostly due to their being willing to cut the sheets.....I got lucky when I asked how many cuts they will make for free the "new guy" told me 6...really is should be 2, but it was sunday and he was new.....lol
I glued and screwed 3 sides to the base.

I made the lid and front into one piece so I could have better access to the batteries.


I found an old inverter that never worked and salvaged the 12 volt cooling fan to use as a vent for the battery box. With a little trim it fit into an old PVC elbow so I used some silicone to seal things up, added about a foot of pipe and ended up with this.


I used my hole saw to get the vent tube and wires installed, added some old paint and purchased some latches and the box was done.


Here it is installed into the RV's front storage compartment. I did have to drill 5 holes, 4 for the mounting screws and 1 big hole for the vent tube to exit under the RV. I still need to run all the cable and add a strap to hold down the batteries. I bought 7 nice 12 inch cables from National Battery today


Solar System gets some control

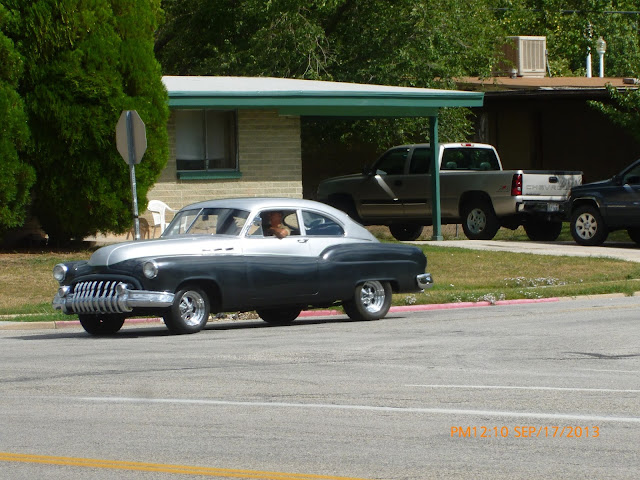
Lucky day today.....I just happened to have my camera in my pocket when I noticed this early 50's Buick across the street.

I got two shots of it....the driver was so cool acted like he did not see me standing on the sidewalk fumbling to get a photo.....not many of these 2 door fast back Buicks left.
I guess a few photos of my 250 Watt solar panels are due....this is the one at the rear of the 5th wheel, I have it all buttoned up in the lowest position.....this will be the position I will have it to travel.


Here is the center panel....if I ever use the other panels that is....I have raised to it's highest angle.

I guess my next step will be to put the vents back on and clean out the other vents....I found the one next to the center panel was plugged with mud.....I have read about the mud critters that plug everything up so I was not very surprised........just a reminder how easy we have it here in the high desert....

Oh ya this was about the controller...


I installed it in the closet...hope it does not get too hot in there....another on of those TBI things....I had planed to have it on the outside wall of the closet in the bedroom, but forgot and mounted it right where the wires came down next to the vent......trust me it was not the first error on this project.....lets just hope nothing burns the trailer to the ground.

I have lost many hours of sleep trying to keep things worked out and straight in my mind......I had all the battery and inverter figured out a few weeks ago, but now have forgotten everything.....today I found some notes...funny I usually forget to make notes......happy days this time.!

I found a nice 3 switch at Lowes and installed it......made it look nice then wrote off and on.....got it all wired with the rear panel switch at the rear and center panel switch in the center.....then....turned the switch upside down when I put it all together....spend about two hours checking and double checking the panels.....climb the ladder cover the panels, climb down the ladder test....over and over and over...finally pulled the switch out of the box only to see what I had done......I could only get the center panel to switch on......the rear panel was then wired to the front switch (I never thought to try that one).
Once I got the switch right side up, I could not remember off from on....lol....I burned up the bulb on my tester.....250 watts really throws a spark.

Anyway as you can see the controller is showing a GREEN light for the batteries, but that took me an hour or so to figure out as the light was RED till I figured out I need to double up the 6 volt batties to make 12 volts....once I did that I got a Green light.

The batteries are fully charged( I hope ) so the solar charger is not asking the panels to charge.....have to drain the batteries a bit to see how things are working.

Friday, September 13, 2013

Had a very busy day yesterday

I'd like to share just a little about TBI .....we have funny little emotional qerks that we cannot control...some have ticks, some laugh at the wrong time, some talk on and on and on, some do not talk much at all....some of use cry at inappropriate times....I an one of the criers, but once in awhile I cry at appropriate times....out of pure happiness for others.


http://www.youtube.com/watch?v=11oMu365xYU#action=share


I did get a little done on my solar panels yesterday...got some help from a stranger who pulled over at the end of my driveway on his bog bad scooter to talk with his wife, he was very gracious and made sure I had the panels safe before he went on his way.
I got one of the panels bolted down before fatigue set in....I was as tired as I ever remember being. Tired to the point I was afraid I might not be able to climb down off the top of the 5th wheel, a few mins of rest and I finally just forced myself to get down. I took some photos, but never checked to see if the sim card was installed.......I'll have to retake some photos later.

Wednesday, September 11, 2013

500 watts of free electicity!!! if the sun is out that is

I purchased 4 new solar panels from http://www.ramsond.com/solarprod.php
They are 250 watts each, I will only install 2 panels at this time, but the installation will be the same for the other two....it is called stacking. I will need a charge controller for each pair of panels.
By the way I have plenty of room on the top of the 5th wheel for 3 panels, but the 4th one will be difficult so if it is not needed I will not use it.

Here is what arrived on my driveway.
I guess I should have been more specific as to which driveway I wanted them dropped off at...lol!
I had to carry each panel around to the other driveway next to the garage. These panels were very well packaged, they arrived in excellent condition.

I even got a really nice purse???? It had the paper work inside.....to be honest the instruction were of little help......BUT.....the tech support people are FANTASTIC!!!!!!!!!!!            
I can not say enough about how impressed I am with the quality of these panels.
Not sure if I want to show off my work station or not, but here it is. The Harbor Freight drill press lasted about 3 holes......what a waste of money....I bought it years ago and this was the first time I ever used it....I should have known better!!!!  

I had a local metal supply dealer cut the 1/8th inch 1.5 x 1.5 angle iron. Then I drilled the holes for the blind nuts I got at the local nut and bolts......they supplied all the hardware for this project.


These are the legs I made for tilting the panels....I drilled multiple holes for additional options. To be honest I followed the kid at the counter's suggestion for installing the blind nuts and then at the last one I remembered the correct way.....Got to love TBI!!!!       

 He had me use a large nut as a spacer? grip the nut from the back side with vise grips and then crank down on things.....what a mess....the correct way would be to put a nut on the bolt then install the bolt into the blind nut and turn the first nut away from the head of the nut forcing the blind nut up from the bottom...sorry I do not have photos to show the process.

Here is a photo of one of the legs I made up so I can tilt the panels note the optional holes for different angles.


Here you can see how the hinge works, I installed a nylon washer between the mounting rail and the shorter roof mount.

This is how the mounts look on the back side of the 250 watt panel.

Both mounts are bolted on just need to add other roof mount and the legs.

This is the way things will be bolted together when the panels are in their travel or flat position. The leg is bolted into a holding hole so it does not bounce on the roof as I drive down the road. It would need to be reversed so the blind nut can be used at the other end when in the raised position....confused...I can not tell you how difficult it was for me to figure this all out with my TBI.....something like this would have been so natural for me before.....today for me to do something like this took me days to figure out and then remember the whole thing, once I started to do the work it became extremely difficult for me to build....and yes I did make mistakes ( if you knew me before TBI, you know how easily and quickly I would have built something like this) as it turned out I spent at least 3 days just putting this much together.

I sure hope things are not as out of square as this photo makes them appear????

A hammer and block of wood turned this......
Into this!!!!


Tuesday, September 3, 2013

Crystal Springs Utah


 It's been quite awhile since I posted.........let me update things!!!
I had a busy summer this year. I knew the Buro trailer would never cut it for me for a longer period of time so I sold my 40 Ford Truck to finace the purchase of an RV more up to my needs.
As you may or may not know I suffer from TBI which is a brain injury. I need to be able to rest for hours at a time with my feet up and my head lowered, but not lower than my heart......recliners work very well for me so I need space for a recliner.

I found a great looking 1988 Vogue motor home on ebay, put in the winning bid and flew to Tulsa......flying is one of the most difficult things I can do with TBI, but I had my mind set on this wonderfully cool motor home......then end of the story is the motor home was full of major issues and I ended up staying a week on the sellers couch before hoping on a bus and coming home.....

I decided after seeing the issues with the older motor homes that I wanted a trailer. Many full-time RVers end up with 5th wheel and after looking at a few of them I figured I would at least consider them.

I saw an add on KSL classified that looked interesting........the price was rather low so I told Sandy we should run right out and look at it, and not to be surprised if it was junk......I got it for about 1/2 the price I would have expected........and the condition is an easy 8 out of ten.....pretty good for a guy who would be luck to be a 5 out of ten.

I pulled the awning of my class C ford with the help of my grandson Derrick one wed afternoon and then the following weekend his mother, step-dad and Sandy helped me install it onto the fiver...nick name for 5th wheels is fiver!!!

I did have the visegrips slip out of my hand while loading up the spring leaving me with a broken knuckle on my little pinky.

Derrick and I wanted to checkout the fiver so we went out to Crystal Springs. http://crystalhotsprings.net/

We spent 2 days alone at a very nice camp ground and Derrick spent most of both days in the pool.

Sandy came up to spend Sat and Sun with me and my daughter Randi, Matt my son-in-law and Dino my grandson......Derrick's 1/2 brother came up sat evening for a dutch oven dinner......I hate to say this , but the dinner was a terrible disappointment.

Crystal Springs is a very nice resort with good rates and good facilities.....it is the only hot springs resort left in Utah and I'd say worth the trip.


Here is Derrick standing in the water fall.